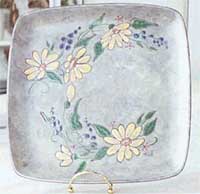
Ware: Bisquefire by Gare #1009 Petal Dinner Plate
Colors:
| Gare
Fun Strokes (FS) 2300 Polar Bear 2304 Green Acres 2307 Firecracker 2311 The Color Purple 2313 Happy Trails 2321 Berry Nice 2325 Happy Go Lucky 2336 Wineona 2351 Yellow Pencil 2359 Lime Light 2365 Mocha Rose |
Gare
Matte Glazes (NTG) 9206 Deep Cherry 9204 Butter |
 |
| Brushes
and Tools: #2 Liner #4 Round #6 Round #4 Shader Fan Glaze Sponge Glaze Carving Kit by Gare or Stylus, Sgraffito and Needle Tool |
Miscellaneous: Pen or Pencil Water Bowl Paper Towels Scissors Clay Carbon Turntable Aluminum Foil or Glazed Tile Practice Paper |
Before class:
- Damp sponge ware to remove any dust and to condition for color.
- Using the Fan Glaze, apply 4 smooth coats of Deep Cherry to the entire piece, allowing drying time between coats.
- To the top surface only, sponge on 3 coats Butter, allowing drying time between coats.
In class:
- Carefully transfer on the pattern being careful not to score the ware.
- Place a small amount of all the colors out onto your foil or glazed tile.
- Using the rounds, block in all the leaves with 1 coat of Happy Go Lucky.
- Working on 1 leaf at a time, apply a 2nd coat of Happy Go Lucky. While still damp, blend from the base with Green Acres.
- Using the shader, side load in Yellow Pencil or Berry Nice, and add highlights to the edges of the leaves.
- Using the rounds, block in the Daisy Petals with 2 coats of Polar Bear.
- Working on1 petal at a time and using a "Chevron Stroke", side load the shader with Lime Light and add this color to the base, where the petal meets the center.
- Using the rounds, load in Yellow Pencil, and fill in the centers. Using the shader, corner load in Mocha Rose and add a "C" stroke in the center.
- There are 2 color families for the Pansy's, Purple and Gold. Using the rounds, block in desired petals with 2 coats of The Color Purple, Yellow Pencil or Wineona.
- Using the #4 round loaded in a darker color, pull in long strokes on the lower 3 petals.
- Using the #2 liner loaded in Yellow Pencil, add the 2 "teardrops" to the pansy center.
- Using the #2 liner or #4 round loaded in Green Acres, fill in the areas under the Daisy buds. Using the #2 liner add stems.
- Using the rounds, apply 2 coats of Happy Trails to the inside handle area on the basket.
- Using the rounds, apply 2 coats of Mocha Rose to the basket weave, and the upright supports.
- Glaze Carve as Follows: When carving, use gentle short strokes and apply slight pressure to allow the tools to cut through the Fun Strokes and Matte Glaze. Carve till you see the basecoat color, Deep Cherry. Start with the needle tool or stylus, and then widen the lines with the wood tool or larger end of the stylus. Remove the color in-between the basket weave with the Sgraffito/Scoop tool and also the turn-backs on some leaves. Be careful not to carve down to the bisque. If you do, using a detail brush, add some Deep Cherry to those areas. Dust the piece well, as any loose color will fire back onto the piece.
After class:
Remove any glaze from the foot area on the plate, or stilt and fast fire
to Cone 06. *If fired hotter, the Matte Glazes will turn glossy.